Category: UTV Gear

  • What Company Makes LED Whip Lights?

    What Company Makes LED Whip Lights?

    As an Amazon Associate we earn from qualifying purchases. This post contains affiliate links, and we may earn a commission at no extra cost to you.

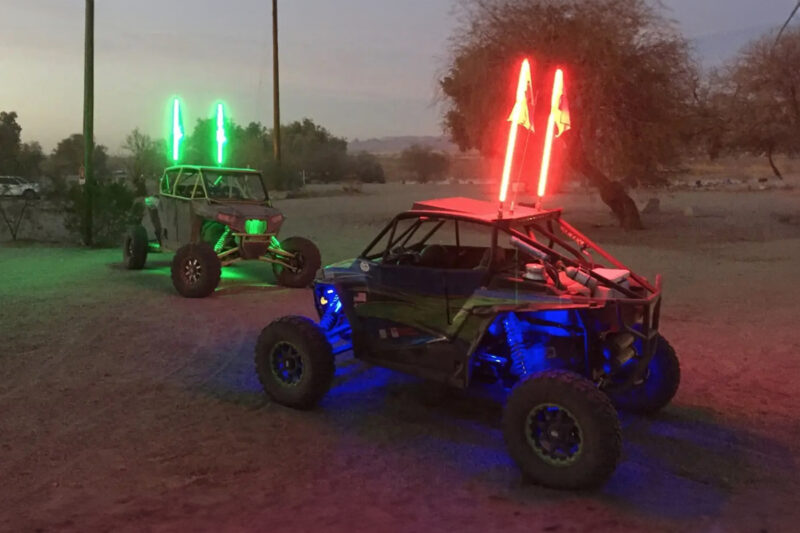
    A handful of brands make most of the LED whip lights you’ll actually see on UTVs and side-by-sides. They’re not identical products with different logos, either. Build quality, brightness, and how they mount vary enough that the brand you pick affects how the whip holds up on rough trails.

    The main players

    Ehaho. One of the more established names in whip lights, known for quick-release bases and remote color and pattern control. Their whips tend to be a middle-of-the-road price point with a wide range of length options.

    Xprite. Popular for the sheer number of color and pattern combinations available, often bundled in pairs with a shared remote. A common pick for riders who want the light show as much as the visibility.

    Nilight. Leans more toward straightforward, durable, single-color whips at a lower price point. Less flash, more focus on just being visible and holding up to vibration and weather.

    True Mods. Known for brighter output than most competitors at a given length, aimed at riders who want the whip to actually function as a visibility tool in dust or low light, not just look good parked.

    What actually separates them

    Three things matter more than the logo: how the base mounts (quick-release versus a fixed bolt-on), whether the light and any RGB function share one cable or run separate wiring, and how the manufacturer weatherproofs the base, since that’s the part that takes the most abuse from mud and water on a trail rig.

    Once you’ve picked a brand, the next question is where to actually put it. See our guide on mounting whip lights on a UTV, and if you’re still deciding whether they’re worth adding at all, we cover that in are whip lights worth it.

    Ready to add a set? Here’s a solid pair of whips with remote-controlled color patterns.

    OUR PICK

    Xprite 5FT 2PCS Spiral RGB LED Whip Light with Bracket Base Chasing Lights RF Remote Control & Rocker Switch Lighted Antenna Whips for Can-Am ATV UTV RZR Polaris Dune Buggy Offroad Truck

    Xprite 5FT 2PCS Spiral RGB LED Whip Light with Bracket Base Chasing Lights RF Remote Control & Rocker Switch Lighted Antenna Whips for Can-Am ATV UTV RZR Polaris Dune Buggy Offroad Truck

    • 【Premium Product Quality】Upgraded quick connect and release base for easy removal and stay fixed to prevent it
    • 【APP & Remote Control】Bluetooth APP and RF remote with a hook by dual control, prevent remote control from bei
    • 【DIY Your Own Creative Modes 】DIY your own lighting effects by self-defining modes, colors, motion directions,
    Check current price on Amazon

    The full guide

  • Mounting whip lights on a UTV

    Mounting whip lights on a UTV

    As an Amazon Associate we earn from qualifying purchases. This post contains affiliate links, and we may earn a commission at no extra cost to you.

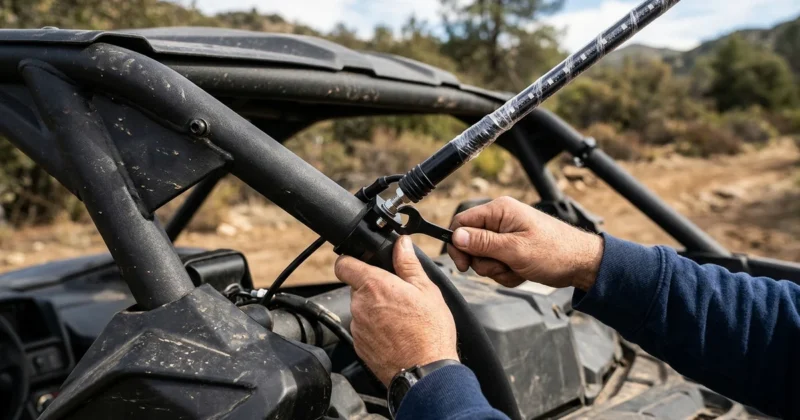
    Most riders mount whip lights at the rear corners of the roll cage, one on each side, bolted to the highest point of the cage that’s still within reach for changing bulbs or batteries. That’s the standard spot for a reason: maximum visibility from behind and the sides, which is the entire point of a whip.

    Rear corners: the default choice

    Mounting at the back two corners of the cage gives other riders on the trail the widest possible view of your whip, whether they’re coming up behind you in the dunes or approaching from an angle. It also keeps the whip out of your direct line of sight while driving, which matters more than people expect. A whip mounted too far forward ends up flapping in your peripheral vision at speed.

    Front mounting: less common, still valid

    Some riders run a single whip up front, usually centered or offset to one side, mainly for dune riding where being seen from the front matters as much as from behind. This works, but expect more wind noise and a slightly different flex pattern since front mounts catch more direct airflow.

    What to check regardless of position

    Wherever you mount it, the base needs a solid, flat surface on the cage, hardware rated for vibration (lock washers or thread locker, not just a bolt snugged down once), and a wiring path that doesn’t rub against anything sharp on the frame as the whip flexes. A loose base is the most common failure point, not the light itself.

    Haven’t picked a whip yet? See installing LED whip lights for the wiring side, and are whip lights worth it if you’re still deciding.

    Ready to add a set? Here’s a solid pair of whips with remote-controlled color patterns.

    OUR PICK

    Xprite 5FT 2PCS Spiral RGB LED Whip Light with Bracket Base Chasing Lights RF Remote Control & Rocker Switch Lighted Antenna Whips for Can-Am ATV UTV RZR Polaris Dune Buggy Offroad Truck

    Xprite 5FT 2PCS Spiral RGB LED Whip Light with Bracket Base Chasing Lights RF Remote Control & Rocker Switch Lighted Antenna Whips for Can-Am ATV UTV RZR Polaris Dune Buggy Offroad Truck

    • 【Premium Product Quality】Upgraded quick connect and release base for easy removal and stay fixed to prevent it
    • 【APP & Remote Control】Bluetooth APP and RF remote with a hook by dual control, prevent remote control from bei
    • 【DIY Your Own Creative Modes 】DIY your own lighting effects by self-defining modes, colors, motion directions,
    Check current price on Amazon

    The full guide

  • Installing LED whip lights 

    Installing LED whip lights 

    As an Amazon Associate we earn from qualifying purchases. This post contains affiliate links, and we may earn a commission at no extra cost to you.

    Selecting the Perfect LED Whip

    LED whips are preferred for their energy efficiency and brightness. They’re available in various lengths, and some even offer customizable color patterns. When choosing an LED whip, consider the compatibility with your vehicle, the brightness level, and any additional features like remote control or weather resistance.  See our guide here to help you select the right LED whip light.

    Preparing for Wiring

    Wiring is the heart of the installation process. You’ll need some basic tools like wire cutters, pliers, electrical tape, and possibly some zip ties to keep everything neat. Here’s a step-by-step guide to wiring your LED whip light:

    1. Identify the Power Source: Locate the wire to the battery or an existing wiring harness to tap into for power. You’ll connect the red wire from the whip to the positive terminal and the black wire to the ground.
    2. Measure and Cut: Use a tape measure to estimate the length of wire needed to reach from the whip’s location to the power source. Cut the wires to length, leaving a little extra just in case.
    3. Strip and Connect: Use wire strippers to expose the underlying copper wire at the end of each wire. Connect the wires using connectors or by splicing them together. Make sure the wire connections are secure.
    4. Secure the Wiring: Run the wire along the frame, using zip ties to secure it in place. Hide the wires underneath panels or along existing wiring paths to keep everything looking clean.
    5. Test the Connection: Before finalizing everything, turn on the whip light to make sure everything is working correctly. Check inside the cab to make sure all connections are intact.
    6. Are you using a rocker switch?  Then you will need to splice into the red power wire and run a line to the rocker switch.  That’s pretty simple but if the rocker switch is lighted you will need to supply power to the switch as well.  Check the wiring guide for your particular switch.

    Mounting the LED Whip Light

    Now that the wiring is done, it’s time to mount the whip light. Here’s how:

    1. Choose the Location: Find a suitable place to install a whip, such as the roll cage or another exposed bar on the frame. The location should be sturdy and visible.
    2. Drill a Hole: Depending on your mounting bracket, you may need to drill a hole for the mounting bolt. Make sure the hole is the right size for the bolt.
    3. Attach the Base: Place the whip light base on top of the hole, insert the bolt, and tighten it down. Slide the whip light base onto the mounting bracket if necessary.
    4. Connect the Whip: Get the whip and attach it to the whip to the base, usually by turning it clockwise. Depending on the whip some models may have a quick connector for easy attachment and removal.
    5. Secure Additional Wiring: If there’s additional wiring for remote control or other features, connect those according to the instructions.
    LED UTV Whip LIghts

    FAQs
    Where is the best place to mount whip lights on a UTV?

    The best place to mount lights on a UTV depends on the specific needs and preferences of the rider, as well as the type of lights being used. Generally, whip lights are …(read more)

    What company makes whips?

    Several companies specialize in manufacturing whips, particularly LED whips for UTVs, ATVs, and other off-road vehicles. Some of the well-known brands in this industry include …(read more)

    Ready to add a set? Here’s a solid pair of whips with remote-controlled color patterns.

    OUR PICK

    Xprite 5FT 2PCS Spiral RGB LED Whip Light with Bracket Base Chasing Lights RF Remote Control & Rocker Switch Lighted Antenna Whips for Can-Am ATV UTV RZR Polaris Dune Buggy Offroad Truck

    Xprite 5FT 2PCS Spiral RGB LED Whip Light with Bracket Base Chasing Lights RF Remote Control & Rocker Switch Lighted Antenna Whips for Can-Am ATV UTV RZR Polaris Dune Buggy Offroad Truck

    • 【Premium Product Quality】Upgraded quick connect and release base for easy removal and stay fixed to prevent it
    • 【APP & Remote Control】Bluetooth APP and RF remote with a hook by dual control, prevent remote control from bei
    • 【DIY Your Own Creative Modes 】DIY your own lighting effects by self-defining modes, colors, motion directions,
    Check current price on Amazon

    The full guide

  • Are Whip Lights Worth It?

    Are Whip Lights Worth It?

    As an Amazon Associate we earn from qualifying purchases. This post contains affiliate links, and we may earn a commission at no extra cost to you.

    Whip lights, those dazzling accessories that add flair and safety to off-road vehicles, have been a hot topic among enthusiasts. But are they really worth the investment? Let’s dive into the world of whip lights and explore what makes them a must-have for many.

    LED whips are preferred for their energy efficiency and brightness. They’re available in various lengths, and some even offer customizable color patterns. When choosing an LED whip, consider the compatibility with your vehicle, the brightness level, and any additional features like remote control or weather resistance.  See our guide here to help you select the right LED whip light.

    My LED Whip Light Experience

    I’ve had the chance to test and experience various whip lights on my RZR. From the cool blue lights of Gorilla Whips to the simple yet bright white LEDs of Buggy Whips, each product has its unique charm.

    I’ve driven through dunes and rough terrains, and the whip lights didn’t just improve my visibility; they added a cooler vibe to my ride. The ability to change the color, adjust the brightness, and even sync the lights with music made the experience even more enjoyable.

    The installation was relatively simple, and the remote control functionality was a definite plus. I’ve also appreciated the waterproof and weather-resistant features, ensuring that the lights won’t give in to harsh conditions.

    Considerations before buying whip lights

    When considering buying whip lights, check for features like waterproofing, weather resistance, and battery life. Sites like Amazon offer a wide range of options but don’t overlook specialized stores that might provide a more tailored selection.  Before making a purchase, consider your vehicle’s specific needs, the conditions you’ll be driving in, and your personal preferences. Whether you want a single LED whip light or a pair, flexible or rigid, colorful or white, take the time to explore and choose what suits you best.

    LED UTV Whip LIghts

    Gorilla: a Lead Company in Whip Lights

    Gorilla Whips stand out as a top choice for many. With their bright LEDs, remote control functionality, and durable build, they offer a better experience for riders. Their quick-release harness and customizable options make them a favorite among off-road enthusiasts.

    LED whip lights are known for their quality and durability. Brands like Gorilla Whips are renowned for their color-changing lights and excellent build. They offer one of the best experiences for off-road enthusiasts, with customizable options and easy installation.

    LED UTV Whip LIghts

    Conclusion

    So, are whip lights worth it? Definitely! They add safety, style, and functionality to your off-road vehicle. Whether you’re looking for a cheap option or are willing to invest in a high-quality product, whip lights offer something for everyone.

    From enhancing visibility to allowing you to customize your ride with color-changing lights, whip lights are more than just a flashy addition. They enhance the driving experience, ensure safety, and give you the chance to express your personality on the road.

    Consider your needs, explore the options, and choose the whip lights that will make your ride brighter and better. Happy driving!

    FAQs

    What is the purpose of whip lights on UTV?

    Whip lights on UTV (Utility Task Vehicles) serve several essential purposes, enhancing the overall riding experience. They make the UTV more visible to other riders, especially …(read more)

    Mounting whip lights on a UTV?

    The best place to mount lights on a UTV depends on the specific needs and preferences of the rider, as well as the type of lights being used. Generally, whip lights are mounted …(read more)

    Ready to add a set? Here’s a solid pair of whips with remote-controlled color patterns.

    OUR PICK

    Xprite 5FT 2PCS Spiral RGB LED Whip Light with Bracket Base Chasing Lights RF Remote Control & Rocker Switch Lighted Antenna Whips for Can-Am ATV UTV RZR Polaris Dune Buggy Offroad Truck

    Xprite 5FT 2PCS Spiral RGB LED Whip Light with Bracket Base Chasing Lights RF Remote Control & Rocker Switch Lighted Antenna Whips for Can-Am ATV UTV RZR Polaris Dune Buggy Offroad Truck

    • 【Premium Product Quality】Upgraded quick connect and release base for easy removal and stay fixed to prevent it
    • 【APP & Remote Control】Bluetooth APP and RF remote with a hook by dual control, prevent remote control from bei
    • 【DIY Your Own Creative Modes 】DIY your own lighting effects by self-defining modes, colors, motion directions,
    Check current price on Amazon

    The full guide

  • How Long Do Can-Am Maverick X3 Drive Belts Last?

    How Long Do Can-Am Maverick X3 Drive Belts Last?

    As an Amazon Associate we earn from qualifying purchases. This post contains affiliate links, and we may earn a commission at no extra cost to you.

    Can-Am may tell you to swap out your X3 belt every 500 miles, but I’m here to tell you that with a bit of careful driving, you can stretch that bad boy to 1500-2000 miles. That’s right, I’m talking about driving with finesse, taking those turns slow and steady, and not gunning it like some kind of maniac. So next time you’re out there on the trail, remember to treat that belt with the respect it deserves, and you’ll be rewarded with many more miles of adventure

    When it comes to the Can-Am X3, one question that always seems to be on people’s minds is just how long that drive belt can hold out. Will it last you for hundreds of miles of trail riding, or is it more likely to give out on you just when you’re starting to hit your stride?

    Well, my friends, the answer is a bit more complicated than a simple number. You see, there are a lot of factors that can impact the lifespan of your X3 belt, from the kind of terrain you’re traversing to how much horsepower your vehicle is packing.

    Buy the right belt with our buying guide on finding your Can-Am X3 belt

    Does your X3 drive belt temperature matter?

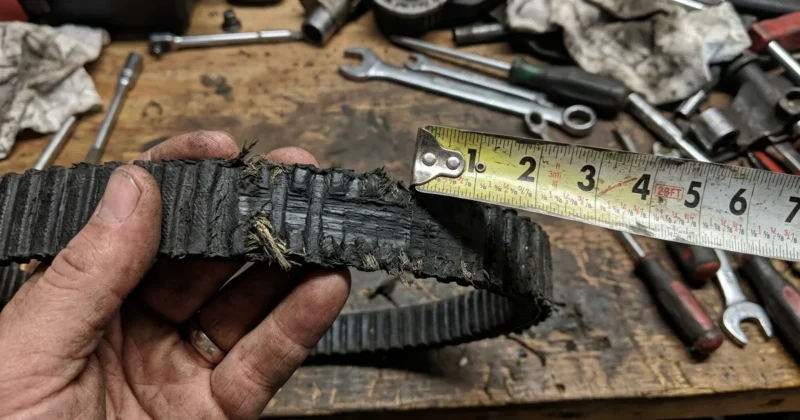
    The primary thing to watch out for is too high of a belt temperature.  The high temperatures can slightly melt the belt sides and cause what’s called glassing.  You will see a slightly shiny area on the side of your belt.

    Understanding the Role of the CVT Belt in Your Can-Am X3

    The CVT belt, often referred to as the drive belt, is the unsung hero of your Can-Am X3. It transfers power from the engine to the wheels, ensuring smooth and efficient performance. However, like any other component, it requires regular maintenance and care to function optimally.

    The Importance of Regular Belt Maintenance

    Regular belt maintenance is not just about ensuring your Can-Am X3 runs smoothly. It’s about preventing unexpected breakdowns during your off-road adventures. A well-maintained CVT belt can withstand the rigors of rock crawling, dune bashing, and other extreme off-road conditions.

    Preventing Belt Failure: The Key to Longevity

    Belt failure is a common issue among Can-Am X3 owners. However, it can be prevented with regular inspections, proper installation, and an understanding of the signs of wear and tear. By keeping an eye on the belt temperature and changing the belt at the right time, you can prevent catastrophic belt failure.

    Is Can-Am X3 clutch alignment important to belt life?

    You bet it is, clutch alignment should be maintained although it is fine coming from the factory.  If you are constantly experiencing belt tears you should check the alignment between the primary and secondary clutch and make sure your belt is riding in the center of the two clutches.

    It’s important to keep in mind, too, that regular inspection and maintenance can go a long way toward extending the lifespan of your drive belt. Keep an eye out for any signs of wear and tear, such as fraying or cracking, and make sure to address any issues promptly.

    In the end, the longevity of your Can-Am X3 belt will depend on a variety of factors, some within your control and others not so much. But with careful attention and a bit of luck, you should be able to get plenty of miles out of your trusty drive belt, whether you’re racing through the wilds or just puttering around the farm.

    Making Your Belt Last Longer: Tips and Tricks

    Making your belt last longer is not rocket science. It’s about understanding your vehicle, adapting your driving style, and following a set maintenance routine. Here are some tips to help you extend the life of your CVT belt:

    1. Proper Break-In: A new drive belt requires a proper break-in period. This involves achieving a high number of flex cycles under low load while maintaining low temperatures. This process allows the belt to wear and mate to the proper angle of the sheaves, ensuring optimal performance.
    2. Avoid High Speeds: High speeds can lead to excessive heat, causing the belt to wear out faster. During the break-in period, avoid wide open throttle and high speeds to ensure the longevity of your belt.
    3. Use Low Gear: When tackling steep inclines or heavy loads, use low gear. This reduces the strain on the belt and prevents overheating.
    4. Regular Inspection: Regularly inspect your belt for signs of wear and tear. Look for cracks, fraying, or any signs of damage. If you notice any issues, replace the belt immediately.
    5. Keep It Clean: Dust and debris can cause premature wear and tear on your belt. Regularly clean the belt and the clutch housing to keep them in optimal condition.
    6. Monitor Belt Temperature: Overheating is a common cause of belt failure. Consider installing a belt temperature sensor to monitor the belt’s temperature and prevent overheating.

    Which X3 belt should you put in when this one goes?

    A worn belt gets replaced with a belt that fits a Can-Am X3, not whatever is cheapest on the shelf. The GBoost is the one most X3 owners end up on, and it is the belt we recommend after comparing the four that are actually worth buying.

    Our Pick For The X3

    GBoost Worlds Best Belt for Can-Am X3 and Defender

    GBoost Worlds Best Belt, Can-Am X3 and Defender

    • Highest shock load rating in the range, rated for 400hp machines
    • Aramid fiber cord wrapped over the bottom cogs for cog strength
    • Bottom cog design built for rotational efficiency at full shift
    • Costs more than an OEM belt, and it is one specific fitment, so check yours
    Check current price on Amazon

    Three other X3 belts are worth a look before you commit, including the OEM part and a cheaper option that holds up better than its price suggests. See all four compared in our Can-Am X3 belt guide.

    By following these tips, you can ensure that your CVT belt will last a set number of miles, providing you with reliable performance during your off-road adventures.

    Related Questions About Can-Am X3 Drive Belts

    Can I Replace a Can-Am Drive Belt Myself?

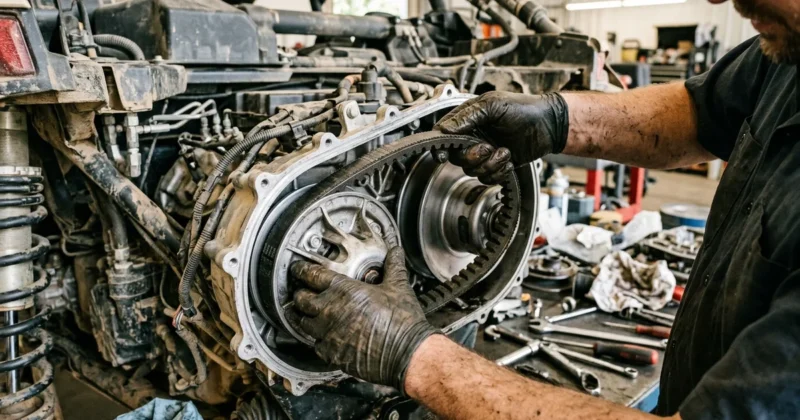
    Yes, you can it ain’t rocket surgery. You can swap out a Can-Am drive belt yourself. No need to fork over your hard-earned cash to a mechanic. Just grab your tools and get to work.

    How Do I Know My Can-Am X3 CVT Belt Is Worn?

    One of the most common injuries that X3 riders face is a worn-out drive belt. You check for glassy sides of the belts. Also, sluggish acceleration or jumping suddenly can be a sign of a worn belt

    How Long do Can-Am X3 drive belts last?

    When it comes to the Can-Am X3, one question that always seems to be on people’s minds is just how long that drive belt can hold out. Will it last you for hundreds of miles of trail riding, or is it more likely to give out on you just when you’re starting to hit your stride?

    Why do X3 belts break?

    X3 belt breakage can be attributed to several reasons, including overloading, harsh riding conditions, poor maintenance, or manufacturing defects. Overloading the vehicle or carrying excessive weight can strain the belt, causing it to fail. Similarly, riding in harsh conditions like extreme heat or dust can accelerate belt wear and reduce its lifespan. Lack of maintenance, such as not keeping the belt clean or ignoring signs of wear, can also lead to belt breakage. In rare cases, manufacturing defects may cause premature belt failure.

    What does a failing drive belt sound like?

    X3 belt breakage is a problem that can have several culprits. It could be due to overloading the vehicle with too much weight or putting it through the wringer in harsh riding conditions. Riding in extreme heat or thick clouds of dust can speed up the wear and tear on the belt, causing it to fail sooner. Neglecting to keep the belt clean or ignoring warning signs of wear and tear can also lead to breakage. And, in some rare instances, defects in the manufacturing process may cause the belt to fail before its time.

    How do you break in a new X3 belt?

    If you want to keep that X3 of yours runnin’ smooth and strong, you gotta give that belt the break-in it deserves. Don’t go slammin’ down the pedal and expect everything to work like a charm. No, sir. Take it easy for the first 5 to 10 miles, keep it in low gear if you got it, and vary them speeds. If you ain’t got low gear, take it moderate for 50 miles. And don’t forget, it ain’t just about the miles. Keep them engine RPMs low and steady, and you’ll be good to go.

    Why do my belts keep ripping?

    Why do my Can-Am drive belts keep ripping? Well, it could be due to overloading the vehicle or carrying too much weight, harsh riding conditions such as extreme heat or dust, poor maintenance, or even manufacturing defects. Take good care of your belt and avoid straining it, and you’ll have fewer problems.

    How much does it cost to get a drive belt replaced?

    If you’re handy enough, you can replace your X3 drive belt for less than two hundred bucks. Just grab a new belt for around 150 and some tools, if you don’t already have some, for 30 bucks, and you’re good to go.

    Should you wash a Can-Am CVT belt?

    Washing a new drive belt before installation is a hotly debated topic. But if you insist on giving it a bath, use warm, soapy water and let it air dry before you slap it on.

    Are Can-Am X3 belts directional?

    New belts don’t give a damn about direction, but used ones sure do. Directional arrows on some belts are just a reminder to put it back on the same way if you ever take it off. To prolong your belt’s life, it’s wise to always run it in the same direction.

    Can you drive with a worn Can-Am drive belt?

    Can you drive with a worn Can-Am drive belt? Well, you can, but it’s like walking around with a ticking time bomb in your pocket. You never know when it’s going to go off and leave you stranded in the middle of nowhere. So, if you value your time and sanity, it’s best to replace that worn belt before it’s too late.

    What happens if you don’t change your Can-Am drive belt?

    Well, friend, if you don’t change your Can-Am drive belt, you’ll eventually find yourself stranded in the middle of nowhere with a busted belt and a sour mood. A worn-out belt can break unexpectedly, leaving you high and dry on the trail or in the field. Not to mention, a damaged belt can cause other issues with your vehicle’s performance, leading to costly repairs down the road. So, don’t be a fool – keep that drive belt fresh and enjoy your ride without any unnecessary headaches.

    Will a broken Can-Am drive belt destroy my engine?

    No, it won’t destroy your engine. The rev limiter will kick in and you may get a light on your dash. Just shut her down and clean out the old drive belt and replace it with a new belt. Disconnect the battery to clear the dash light then reconnect it and get on with your day.

    Can you spray wd40 on X3 belt?

    Don’t do that WD40 is a lubricant and your UTVs drive belt works with friction applied to the belt. A lubricant reduces friction and would defeat the purpose of the belt.

  • How Do I Know My Can-Am X3 Belt Is Worn?

    How Do I Know My Can-Am X3 Belt Is Worn?

    As an Amazon Associate we earn from qualifying purchases. This post contains affiliate links, and we may earn a commission at no extra cost to you.

    When it comes to conquering the wild, there’s no beast quite like the Can-Am X3. These bad boys are built to last, with enough speed and grit to take on any terrain that dares to stand in their way. But, like any warrior, even the toughest machines can suffer from the wounds of battle. One of the most common injuries that X3 riders face is a worn-out drive belt. In this here piece, we’ll explore the ways you can tell if your trusty steed’s belt is worn down, and what you can do to make sure it’s always ready for the next adventure.

    Whats-the-best-cvt-belt

    Buy the right belt with our buying guide on finding your Can-Am X3 belt

    What is a Can-Am X3 CVT belt?

    Listen up. You have gotta know what that drive belt does and how it works. They call it the CVT belt, and it’s what transfers power from the engine to them wheels. It’s like the backbone of the clutch system, along with the primary and secondary clutches. When that engine revs up, the primary clutch engages the drive belt, which in turn spins the secondary clutch and bam! You’re off, flying down the road. But, if that drive belt fails or wears out, well, you might as well get ready to walk.

    So, how can you tell if your X3 CVT belt is worn? 

    1. You step on the gas, but your X3 ain’t going nowhere fast. It used to fly like a bat out of hell, but now it’s all jerky and jumpy. That’s the telltale sign that your belt is worn, slipping, or both.
    2. There’s a burning smell in the air, like someone’s set fire to your clutch system. And who knows, maybe they have. If your belt’s slipping, it’s generating heat and friction, and that’s never a good thing.
    3. Belt dust and debris scattered around the clutch area. It’s like your X3’s shedding, leaving a trail of its own decay behind. That’s the mark of a belt that’s seen better days.
    4. As the belt heats up, it can start to glass on the edge. You won’t see it on the teeth, but the belt’s edges will shine like glass. It’s a clear sign that you need to give that belt a break or get a new one before you end up stranded on the side of the road.

    Drive Belt Maintenence

    Listen up, folks, if you want that X3 belt to stay in tip-top shape, you gotta keep up with the maintenance and inspections. And here’s a little tip from yours truly: keep that belt cool. Heat can be a real killer for these things, so you gotta make sure there’s enough airflow around the clutch system. One way to do that is to slap on a belt cooling kit or make sure the clutch cover’s got enough ventilation. Trust me, it’s worth it to avoid the headache of a busted belt.

    Prevent Belt Failure With High-Quality Aftermarket Belts

    When it’s time to swap out your X3 belt, don’t skimp on quality. You’ll want a belt that’s tough as nails and the perfect size for your ride. Sure, there are plenty of belts on the market that’ll fit your X3, but don’t settle for just any old belt. Invest in one that’s tailored to your machine like the original Can-Am X3 belts. And when it comes time to install the new belt, make sure you follow the manufacturer’s instructions to the letter. While you’re at it, take a good hard look at the primary and secondary clutches to make sure they’re not showing any signs of wear and tear. You don’t want to have to go through this process again anytime soon.

    Final Thoughts

    And so, my friends, a worn-out X3 belt is the kind of headache that can make even the toughest side-by-side owner cringe. But fear not, for with a little tender loving care, you can keep that belt humming like a well-oiled machine and avoid any sudden breakdowns out on the dusty trail. Keep a watchful eye out for the telltale signs of wear and tear, make sure to keep things cool under the hood, and when it’s time to replace that old belt, be sure to choose a top-of-the-line replacement that’s up to the task. Armed with these tips, you’ll be free to take on any terrain in your trusty Can-Am X3 with confidence and swagger.

    Related Questions About Can-Am X3 Drive Belts

    Can I Replace a Can-Am Drive Belt Myself?

    Yes, you can it ain’t rocket surgery. You can swap out a Can-Am drive belt yourself. No need to fork over your hard-earned cash to a mechanic. Just grab your tools and get to work.

    How Do I Know My Can-Am X3 CVT Belt Is Worn?

    One of the most common injuries that X3 riders face is a worn-out drive belt. You check for glassy sides of the belts. Also, sluggish acceleration or jumping suddenly can be a sign of a worn belt

    How Long do Can-Am X3 drive belts last?

    When it comes to the Can-Am X3, one question that always seems to be on people’s minds is just how long that drive belt can hold out. Will it last you for hundreds of miles of trail riding, or is it more likely to give out on you just when you’re starting to hit your stride?

    Why do X3 belts break?

    X3 belt breakage can be attributed to several reasons, including overloading, harsh riding conditions, poor maintenance, or manufacturing defects. Overloading the vehicle or carrying excessive weight can strain the belt, causing it to fail. Similarly, riding in harsh conditions like extreme heat or dust can accelerate belt wear and reduce its lifespan. Lack of maintenance, such as not keeping the belt clean or ignoring signs of wear, can also lead to belt breakage. In rare cases, manufacturing defects may cause premature belt failure.

    What does a failing drive belt sound like?

    X3 belt breakage is a problem that can have several culprits. It could be due to overloading the vehicle with too much weight or putting it through the wringer in harsh riding conditions. Riding in extreme heat or thick clouds of dust can speed up the wear and tear on the belt, causing it to fail sooner. Neglecting to keep the belt clean or ignoring warning signs of wear and tear can also lead to breakage. And, in some rare instances, defects in the manufacturing process may cause the belt to fail before its time.

    How do you break in a new X3 belt?

    If you want to keep that X3 of yours runnin’ smooth and strong, you gotta give that belt the break-in it deserves. Don’t go slammin’ down the pedal and expect everything to work like a charm. No, sir. Take it easy for the first 5 to 10 miles, keep it in low gear if you got it, and vary them speeds. If you ain’t got low gear, take it moderate for 50 miles. And don’t forget, it ain’t just about the miles. Keep them engine RPMs low and steady, and you’ll be good to go.

    Why do my belts keep ripping?

    Why do my Can-Am drive belts keep ripping? Well, it could be due to overloading the vehicle or carrying too much weight, harsh riding conditions such as extreme heat or dust, poor maintenance, or even manufacturing defects. Take good care of your belt and avoid straining it, and you’ll have fewer problems.

    How much does it cost to get a drive belt replaced?

    If you’re handy enough, you can replace your X3 drive belt for less than two hundred bucks. Just grab a new belt for around 150 and some tools, if you don’t already have some, for 30 bucks, and you’re good to go.

    Should you wash a Can-Am CVT belt?

    Washing a new drive belt before installation is a hotly debated topic. But if you insist on giving it a bath, use warm, soapy water and let it air dry before you slap it on.

    Are Can-Am X3 belts directional?

    New belts don’t give a damn about direction, but used ones sure do. Directional arrows on some belts are just a reminder to put it back on the same way if you ever take it off. To prolong your belt’s life, it’s wise to always run it in the same direction.

    Can you drive with a worn Can-Am drive belt?

    Can you drive with a worn Can-Am drive belt? Well, you can, but it’s like walking around with a ticking time bomb in your pocket. You never know when it’s going to go off and leave you stranded in the middle of nowhere. So, if you value your time and sanity, it’s best to replace that worn belt before it’s too late.

    What happens if you don’t change your Can-Am drive belt?

    Well, friend, if you don’t change your Can-Am drive belt, you’ll eventually find yourself stranded in the middle of nowhere with a busted belt and a sour mood. A worn-out belt can break unexpectedly, leaving you high and dry on the trail or in the field. Not to mention, a damaged belt can cause other issues with your vehicle’s performance, leading to costly repairs down the road. So, don’t be a fool – keep that drive belt fresh and enjoy your ride without any unnecessary headaches.

    Will a broken Can-Am drive belt destroy my engine?

    No, it won’t destroy your engine. The rev limiter will kick in and you may get a light on your dash. Just shut her down and clean out the old drive belt and replace it with a new belt. Disconnect the battery to clear the dash light then reconnect it and get on with your day.

    Can you spray wd40 on X3 belt?

    Don’t do that WD40 is a lubricant and your UTVs drive belt works with friction applied to the belt. A lubricant reduces friction and would defeat the purpose of the belt.

    If you’re shopping for a replacement, this is the belt we point people to for the X3’s CVT.

    OUR PICK

    GBoost Worlds Best Belt - CanAm X3, Defender

    GBoost Worlds Best Belt – CanAm X3, Defender

    • Highest shock load rating to date being able to withstand the power of the 400hp machines
    • Latest bottom cog design for greater rotational efficiency at full shift
    • Aramid Fiber cord, versus polyester, wraps over bottom cogs for increased bottom cog strength
    Check current price on Amazon